Having multiple accounts at Gmail is a common thing for people in this decade. With the consideration of the advancements that have flowed on the Internet& people have developed an analytical understanding of segregating their professional and personal work. This understanding was supposedly initiated on the email accounts at first. Thus& it is necessary for you to manage the accounts efficiently to actually save time and the energy of understanding the difference between your personal and professional accounts. Signing in and out of the accounts every time you need to check-in is a very tiring process. Henceforth& this article discusses handling multiple Google accounts on Android with a descriptive step-by-step guide on successfully implementing different methods for adding and managing multiple accounts on the same Android device. The major aim is to let people out of the tiring process of constant signing in and out of the Google accounts.
Table of Contents
Part 1: Setup Google Gmail account on Android
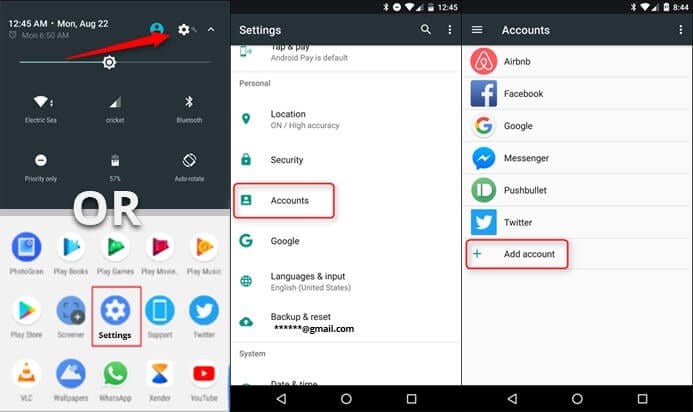
Setting up a Gmail account using an Android phone is a very easy procedure that can be executed with simple tasks. Furthermore& you can even have all the important data present in the account synchronized into the phone. For setting up a Gmail account on Android& follow the steps as discussed below.
Step 1: Access the Settings
Open Settings from the most accessible place and tap on the Accounts option that you would find on the screen.

Step 2: Initiate adding the Account.
This will open another screen in the follow-up. This screen shall include a list of accounts that are already added within the Android. However& to add an account& you can find an option present showing “Add an account” at the bottom of the list.
Step 3: Insert the Credentials
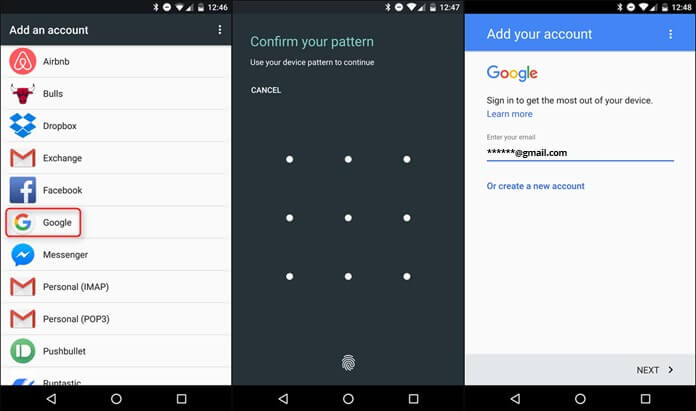
After tapping on 'Add an account&' it opens a list of different domains that are available to be added on the phone. Select the option of Google in the list; this eventually opens up the screen for adding the credentials of the Google Account. You need to add the username and the password following a series of confirmation procedures before finalizing the addition of the Gmail account.

Step 4: Sync the Data
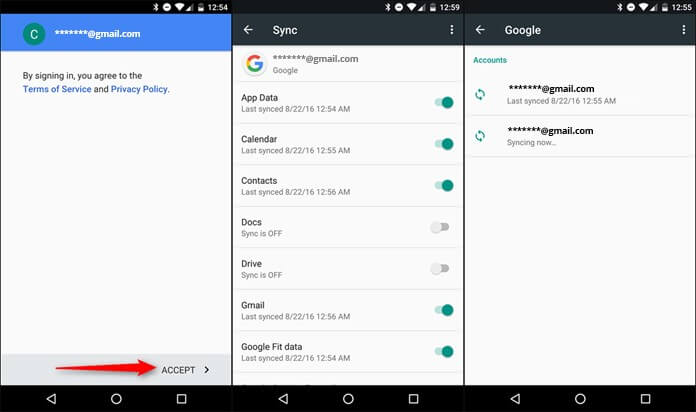
After accepting the Terms and Conditions that are displayed in a separate window& the data associated with the email shall synchronize itself automatically. For keeping one of the Gmail accounts opened continuously& you are required to access the Accounts options from the Settings of the phone to select one account as active.

Part 2: Add multiple Google accounts on Android via Google Gmail
For adding multiple accounts on Google Gmail via the application itself& you need to follow some simple steps that would effectively add as many Gmail accounts as you want to. Google provides its users with multiple sign-in opportunities.

Step 1: Access the Gmail app
You are required to open the Gmail application on your Android. After opening& access the menu icon present on the top left of the screen.
Step 2: Initiate adding the account
After opening the slide menu from the left& you would observe that your username with the current account signed in would be present on the top of the menu. Tap on the right of the username and access the touch-down arrow to get more options over the username. Select the option of Add Account.
Step 3: Select the Account type.
After initiating the adding of multiple Gmail accounts& choose a type of account that you wish to add on the list. There are three options that are provided to every user while adding an account. You can add a 'Google' account& which consists of a Gmail account for the work address. Secondly& you can add a Personal (POP/IMAP) account& which has no domain from Google. You can also add an Exchange account& which consists of a work address that is particularly related to the Microsoft Exchange servers. By following these steps& along with the necessary credentials& you can easily add multiple Google accounts on your Android device.
Part 3: Manage multiple Google accounts on Android
The overall procedure of adding multiple Gmail accounts on Android and managing them is as easy as possible. Google has successfully made this process for its users simple and effortless. Just as adding multiple Google accounts& managing them is no difficulty. Being aware of the process that involves adding Gmail accounts& you can easily swap among multiple accounts without signing in and out of the accounts and manage their notifications along with other prompt messages. To manage multiple accounts and swap among them with ease& you are required to follow these few steps within the Gmail account.

Step 1: Open Menu on the App
After opening the Gmail application& access the Menus' option present on the top left of the screen. It shall open a slide-menu on the front.
Step 2: Observe the usernames.
With the side menu opened& you can observe the username present on the top of the menu. From the options present on its side& you can observe both accounts’ information with ease.
Step 3: Slide through IDs
With multiple accounts present on your front& you can simply slide through different IDs by just clicking on the account& which will open the other account for you. All the notifications and the prompt messages involving the specific account will be displayed on the front. However& it should be kept in notice that you will receive all the notifications related to both accounts on your Android phone. This makes handling multiple accounts easy on Android devices.
Conclusion
This article has presented its users with a considerate guide on adding and handling multiple accounts using Gmail application on your Android phones.


 100% Secure