
The evolutions in technology are bringing many different and effective applications that provide users with explicit features and an extended set of advantages, optimizing different procedures and scaling efficiency among users. Google Docs has been one such product that has labeled technical modifications to the next level. Where word processing software provided the basic requirements of writing, Google Docs enabled users to create, edit and share documents online with other users for allowing them to view, edit and amend documents promptly with no unnecessary delays. This article explains the effective mechanisms on how to transfer Google Docs to another account through unique and contrasting methods.
Table of Contents
How can I transfer the ownership of Google Docs?
Google Docs has provided the feature of transferring ownership of documents, making it more effective than any other traditional word processing software. You can easily transfer ownerships using Google Docs with a very straightforward and effortless procedure. The only requirement for having it done is for the other person to have a Google Account. To successfully transfer ownership of Google Doc, you are required to follow these simple series of steps which are as follows:
Step 1: Sign in the Account having the original document.
Before moving towards the primary task of transferring the document, it is important for you to be signed in with the Google Account that contains the document that is to be transferred.
Step 2: Access the File
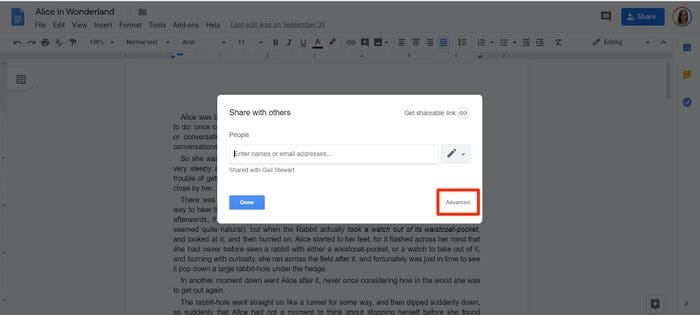
You have to open the file that is to be transferred. After having the file opened on a new screen, you have to tap on the “Share” button on the top-right of the screen. Select the option of “Advanced” that opens another sharing menu on the front.
Step 3: Invite people.
If the document has not been shared by you with any personnel, have it shared with them and let them accept the invitation before proceeding.
Step 4: Transfer Ownership
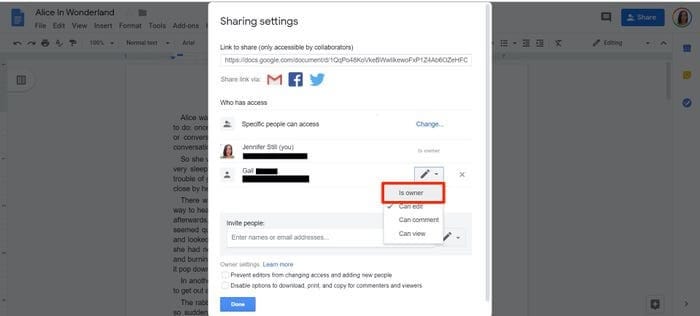
With a list of people with whom you have shared the document, tap on the name of the person you feel to transfer the ownership. Tap on the downward-facing arrow.
Step 5: Execute the task.
This opens a drop-down menu in front of you. Tap on the option of “ is owner” and save all changes.
Step 6: Confirm the Process
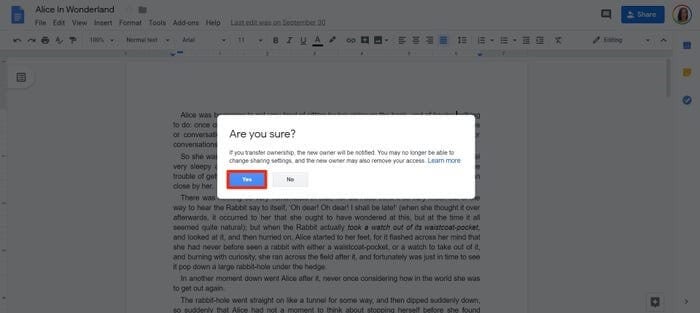
A pop-up menu immediately appears, asking for confirmation of this process. Click on "Ok" to successfully transfer ownership. This executes the simple task of transferring the ownership of a Google Doc.
How to transfer Google Docs to another account for free?
Google Drive provides users with free storage of about 15 GB in size. There comes a time when the space in the Drive runs out, leaving the window to create a new Drive account with the objective of getting more storage space. There are requirements of many users to have their data transferred from one Google Account to another. For that, Google has not provided any simple process to execute successfully. There are different workarounds that are to be carried out for successfully transferring data from one Google Account to another.
2.1: Transfer from school Google Drive docs to a personal Google Account
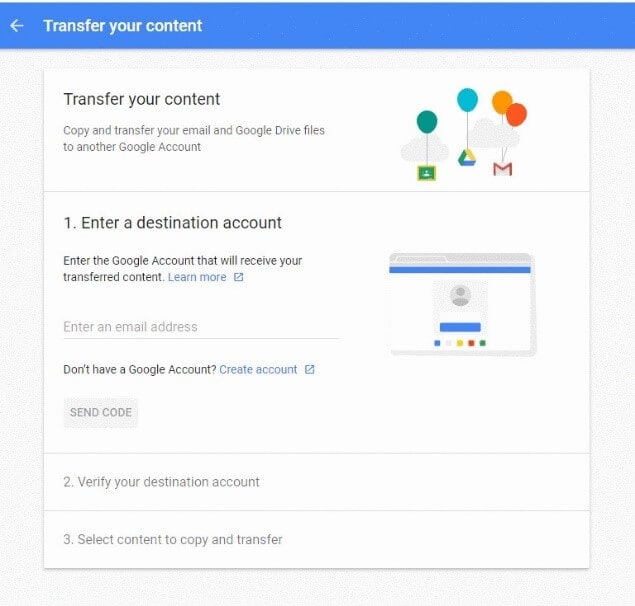
As a primary requirement, it is important for you to be logged in with the School Google Drive. You then need to access the ‘Transfer your content’ page from the following link: https://takeout.google.com/transfer. Following this, you are required to follow a few steps that would guide you through transferring Google Docs from one School Drive to another Personal Google account.
Step 1: Enter the Personal Account
On the screen that is on your front, you are required to enter the email address of your personal account. After tapping on the "Send Code," code will be sent on the account where the data is to be transferred.
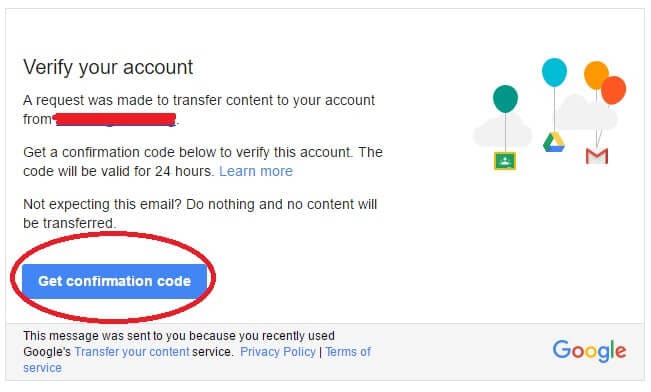
Step 2: Verify the Process
Access the personal email account and check the inbox. A verification email will be present there that would lead you to a confirmation code. Tap on “Get Confirmation Code” to direct yourselves to a new window.
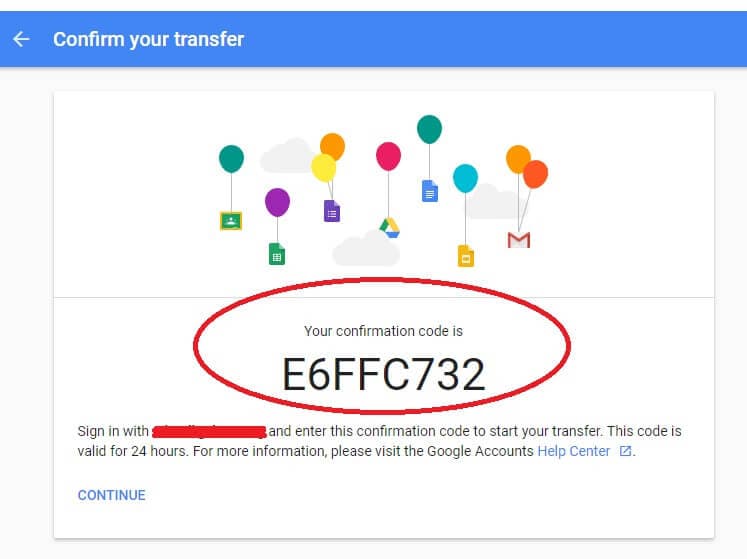
Step 3: Copy the code.
A new window containing the code will be present there. Copy the code.
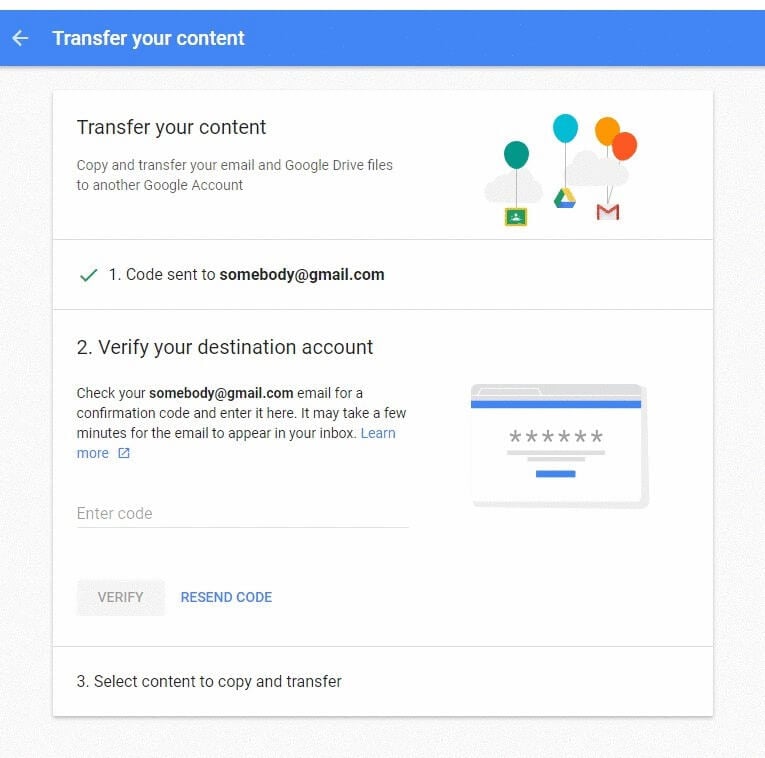
Step 4: Use the Code
The code that has been copied is to be used in the “Transfer your content” tab. Paste that code there and tap on “Verify” to propagate.
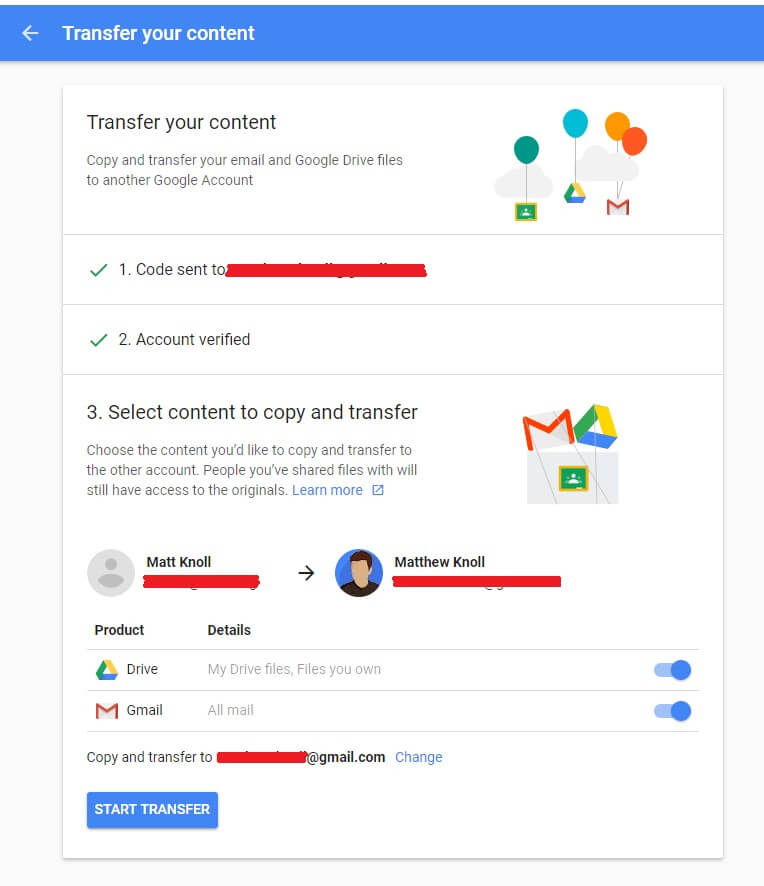
Step 5: Select Data
It is up to you to select the nature of data that is to be transferred. You can either select the Google Drive or the emails or both for transferring. After selecting, select "Start Transfer." This successfully executes, and the data is then transferred to your personal Google Account.
2.2: Transfer from Personal Docs to Swarthmore Account
Transferring data from your Personal Google Drive account to a Swarthmore account is a very compelling task with no complexities. For having it successfully transferred, follow the following simple steps:
Step 1: Select and Share
Select the files that you wish to transfer. Following this, you have to tap the “Share” menu along with giving access to the Swarthmore account where you wish to transfer these files.
Step 2: Log in to the Other Account
After having the data shared with the account, log yourselves into the Swarthmore Google Account. Access the option of "Shared with me." This will lead you to the documents that have been shared with you with the other select. Select the files, including the Google Docs files, and select the option of "Add to My Drive." All the files are now successfully transferred to the Swarthmore account.
Step 3 (Alternative to Step 2): Transfer Data
Apart from the login procedure, you have to similarly lead yourselves to the documents that you have shared with the Swarthmore account. After selecting all assorted documents, you can access the “More Options” drop-down menu. Select the option of “Download” to download these documents as a zip file. Following this, you can upload this folder in the Swarthmore account under the option of “New” following the “Folder Upload” button in the drop-down menu.
Conclusion
This article has allowed users to understand different mechanisms on how to transfer Google Docs from one account to another.
Share


 100% Secure